Page 1 of 1
RustyBucket's International S-100 Build
Posted: Tue Nov 19, 2019 9:01 pm
by rustybucket
To give you all a example of how a build starts and ends, I thought I would post this topic of my build of a S-100 1/2 ton pickup.This build was completed way back in 2000. It still looks good considering it is 17 years old.So let's start with a before picture:

- ihc1.gif (72.46 KiB) Viewed 31558 times
I purchased this truck in the spring of 1996. I got the itch to do an old pickup the previous year and went to an auction in a small town nearby and watched a International L-100 sell that was in fairly good shape. I think it brought about 1,100.00 that day and I didn't want to spend that much at the time. So later I saw an ad in the local paper for this little beauty. I say that with tongue in cheek. Anyway the price was right and I drove it home. It needed a lot of work, more than I planned on, but over the next four years it became a fun adventure. The engine ran, but not well, the cab had only surface rust, but the bed was beyond repair ( I didn't realize that at the time) and all the glass was broken. The interior was there, but needed replacing. So off we went on our grand adventure.

- ihc2.gif (71.43 KiB) Viewed 31558 times
So the first thing we did was to remove the bed and try to remove the floor from it for replacement. We used one of those spot cutter attachments to remove the welds. We got the bed out, but had no idea how we were going to make a replacement. Unlike the Ford or Chevys of the time, it didn't have a easily replaceable wood bed floor.

- ihc_bed1.gif (79.92 KiB) Viewed 31558 times

- ihc_bed2.gif (96.11 KiB) Viewed 31558 times
Re: RustyBucket's International S-100 Build
Posted: Tue Nov 19, 2019 9:30 pm
by rustybucket
Here is a quick shot of the front bumper. I know the pictures are bad, but this is from 20 years ago.

- index_1.gif (38.15 KiB) Viewed 31554 times
It is hard to tell, but the passenger's side was bent back and actually did some damage to the fender. Also, in the left part of the fender you can see a piece of steel sticking out of the bumper that doesn't belong there. The PO had finagled a tow hitch and cut through the bumper, then proceeded to weld it directly to the frame. That was about the only damage to the body. Now let's fast forward to 1999, cause that is what happens with these projects. We finally got back to work on this baby. It sat beside the house for a couple of years while I got my business started. In this picture you can see that we have removed the front clip and the engine.

- index_2.gif (37.1 KiB) Viewed 31554 times
I had also done some research and realized that the colors where actually Magnolia Ivory and Cambrian Coral. Not the usual IH white and red. Just wait till you see it done. Here is a shot of the engine when I took it out. I think I rented the hoist, don't remember now. That thing is heavy. If I remember correctly, the Black Diamond engine weighs between 750 - 1000 pounds. The machine shop thought I was bringing them a tractor engine.

- index_3.gif (75.39 KiB) Viewed 31554 times
I had a friend of mine, who is no longer with us rebuild the engine. So with the engine at the builder and the cab and body off the frame, it stripped the rest of the frame down. My son Brad and I took everything apart on it. The only thing that didn't get dis-assembled were the king pins. They were good, so I left them alone. We took the frame to a local firm that sand blasted it and powder coated it. The rest of the parts where media blasted by myself in a desktop blast cabinet that I got from Harbor Frieght. Items that were not small enough went to a local company to be media blasted. The body got loaded on a trailer and hauled to Holdrege NE and media blasted. Then I took it to a local body shop and it took them about 18 months to get the body work done. While there it was determined that the bed needed to be replaced. So I went to a salvage yard in Edgar and got a good bed and tailgate. The small parts I painted in the garage, such as the transmission, rear end, etc.
Re: RustyBucket's International S-100 Build
Posted: Tue Nov 19, 2019 9:36 pm
by rustybucket
Before sending the frame off for powder coating I had to replace the rear cross member on the frame. I went down to the local metal supplier and had them bend a new C-Channel for the member. Then I used grade 8 bolts to attach it. After getting the frame back from powder coating we started to re-assemble the rolling chassis. I replaced all of the seals in the rear end and repainted it. The springs were re-arched and repainted. New u-joints were installed and the brakes were rebuilt using new wheel cylinders. I had the master cylinder re-sleeved with a brass sleeve by Apple Hydraulics. Then new brake lines and fuel line was run. I purchased a new wiring harness, so all of the electrics were gone through. I had to replace third gear in the transmission. We sealed and finished the gas tank using products from Eastwood. I also had a local radiator shop build a new radiator and heater core.

- frame.gif (55.2 KiB) Viewed 31554 times
Re: RustyBucket's International S-100 Build
Posted: Tue Nov 19, 2019 9:53 pm
by rustybucket
Some more pics of the completed frame.
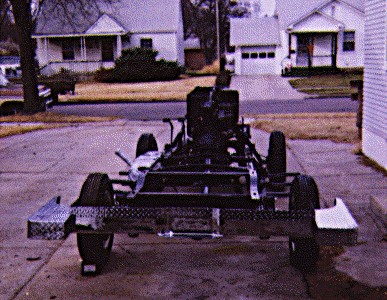
- rearframe.gif (113.7 KiB) Viewed 31550 times

- passengine.gif (170.75 KiB) Viewed 31550 times
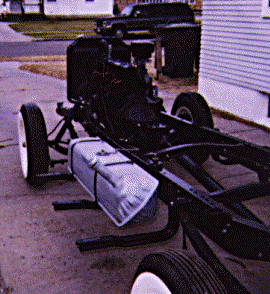
- middleframe.gif (71.71 KiB) Viewed 31550 times
In these pics you can see the engine detail we did. The intake manifold had to have some welding done on it. Then we used some manifold coating from Eastwood on it and the exhaust manifold. The 16" rims were painted Magnolia Ivory to match the body. We mounted wide whitewall bias-ply tires from Coker. A rebuilt carb was purchased. In the background you can see a 78 Ford Super Cab pickup I had restored.
Re: RustyBucket's International S-100 Build
Posted: Tue Nov 19, 2019 9:58 pm
by rustybucket
The next few pics I have here show the cab mounted back on the frame. I don't have any pics from the body shop, so all I can tell you about it, is that it was completely media blasted before being sprayed. It came out perfect.

- cabfdrivers.gif (85.21 KiB) Viewed 31549 times

- cabinterior.gif (83.38 KiB) Viewed 31549 times

- cabrear.gif (85.88 KiB) Viewed 31549 times
Yes the Cambrian Corel looks pink. Doing research on the project, I found that back in the 50's the executives put their wives on the "Color Commitee" and you got some pretty interesting colors. I did receive a Lady's Choice award at one of the shows I took it to, if that means anything.<
Re: RustyBucket's International S-100 Build
Posted: Tue Nov 19, 2019 10:04 pm
by rustybucket
Re: RustyBucket's International S-100 Build
Posted: Tue Nov 19, 2019 10:15 pm
by rustybucket
Re: RustyBucket's International S-100 Build
Posted: Tue Nov 19, 2019 10:24 pm
by rustybucket